Introduction
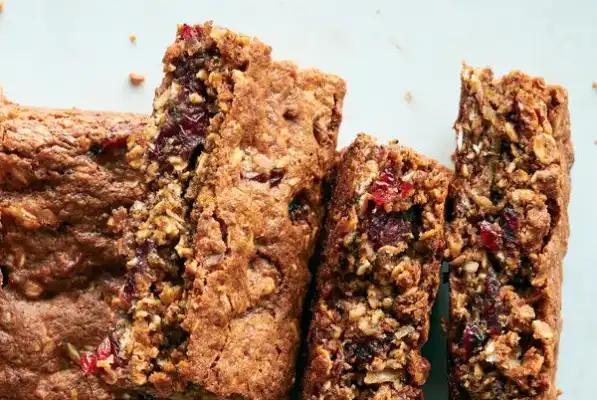
If you’re looking for a simple, wholesome snack that’s perfect for breakfast on the go or a mid-afternoon pick-me-up, these Gluten-Free Bars with Oats and Coconut are just what you need. These bars combine the hearty goodness of gluten-free oats with the tropical sweetness of coconut, making them a delicious and nutritious treat that’s perfect for anyone following a gluten-free diet. The recipe is incredibly easy to make and uses pantry staples you likely already have, such as oats, shredded coconut, honey, and almond butter. Not only are these bars gluten-free, but they’re also free from refined sugar, making them a healthier alternative to store-bought snack bars.
These gluten-free bars are packed with fiber, healthy fats, and natural sweetness, offering a balanced snack that will keep you energized throughout the day. You can enjoy them as a quick breakfast, pack them in your kids’ lunchboxes, or even serve them as a dessert. They’re versatile enough to be customized with your favorite add-ins, like chocolate chips, dried fruit, or nuts, so you can make them your own. Plus, they’re no-bake, which means you won’t have to spend time heating up the oven—just mix, press into a pan, and chill.
Let’s get started with this easy recipe that will quickly become a family favorite!
Ingredients
For these Gluten-Free Bars with Oats and Coconut, you’ll need just a few simple ingredients:
Base Ingredients:
- 2 cups gluten-free rolled oats
- 1 cup unsweetened shredded coconut
- 1/2 cup almond butter (or peanut butter)
- 1/4 cup honey (or maple syrup for a vegan option)
- 1/4 cup coconut oil, melted
- 1 teaspoon vanilla extract
- 1/4 teaspoon salt
Optional Add-ins:
- 1/4 cup mini chocolate chips (gluten-free)
- 1/4 cup dried cranberries or raisins
- 2 tablespoons chia seeds or flaxseeds for added nutrition
- A handful of chopped nuts (almonds, walnuts, or pecans work well)
Step-by-Step Instructions
1. Prepare the Pan
Line an 8×8-inch baking pan with parchment paper, leaving some overhang on the sides. This will make it easier to lift the bars out of the pan once they’re set.
2. Mix the Dry Ingredients
In a large mixing bowl, combine the gluten-free rolled oats, shredded coconut, and any optional add-ins like chocolate chips, dried fruit, or seeds. Stir well to ensure everything is evenly distributed.
3. Combine the Wet Ingredients
In a small saucepan, gently heat the almond butter, honey, and coconut oil over low heat. Stir frequently until the mixture is smooth and well combined. Remove from heat and stir in the vanilla extract and salt.
4. Mix Wet and Dry Ingredients
Pour the warm almond butter mixture over the oat and coconut mixture. Using a spatula, stir everything together until all the dry ingredients are fully coated with the wet mixture.
5. Press the Mixture into the Pan
Transfer the mixture into the prepared baking pan. Using the back of a spoon or your hands, press the mixture firmly into the pan, making sure it’s evenly spread out and compact.
6. Chill the Bars
Place the pan in the refrigerator and let the bars chill for at least 2 hours, or until they’re firm enough to cut. If you’re in a hurry, you can speed up the process by placing them in the freezer for about 30 minutes.
7. Slice and Serve
Once the bars are set, lift them out of the pan using the parchment paper overhang. Place the bars on a cutting board and slice them into squares or rectangles, depending on your preference. Enjoy them right away, or store them for later!
Tips for Success
Use Gluten-Free Oats:
It’s important to use certified gluten-free oats in this recipe, as regular oats are often processed in facilities that handle wheat, which can lead to cross-contamination.
Press Firmly:
To ensure your bars hold together, make sure to press the mixture firmly into the pan. The tighter you pack the mixture, the better the bars will stick together once they’re chilled.
Customize to Your Liking:
This recipe is incredibly versatile, so feel free to get creative with the add-ins. Whether you prefer chocolate chips, dried fruit, or nuts, the possibilities are endless. Just be mindful of any additional moisture that some ingredients (like fresh fruit) may introduce.
Storing the Bars:
These bars can be stored in an airtight container in the fridge for up to a week. If you’d like to keep them longer, they can be stored in the freezer for up to 3 months. Simply thaw in the fridge overnight before eating.
Recipe Variations
Chocolate-Dipped Bars:
If you want to take these bars to the next level, try dipping the bottom of each bar in melted dark chocolate. Simply melt the chocolate in a microwave-safe bowl, dip each bar, and place them on a parchment-lined baking sheet to set.
Nut-Free Version:
For a nut-free option, you can substitute the almond butter with sunflower seed butter or tahini. This makes the recipe safe for those with nut allergies while still providing a creamy texture.
Fruit and Nut Bars:
For a fruitier version, add in 1/4 cup of dried cranberries or raisins, along with a handful of chopped nuts like almonds or walnuts. This will give the bars a delicious crunch and added sweetness.
Protein-Packed Bars:
Boost the protein content by adding a scoop of your favorite gluten-free protein powder. Simply mix it in with the dry ingredients before adding the wet mixture.
Serving Suggestions
These Gluten-Free Bars with Oats and Coconut are perfect for any time of day. Here are some ideas on how to enjoy them:
Breakfast on the Go:
If you’re running late in the morning, grab a bar or two for a quick and healthy breakfast. Pair them with a piece of fruit or a smoothie for a more complete meal.
Snack Time:
These bars are the perfect mid-afternoon snack when you need a little pick-me-up. They’re portable, easy to pack, and will give you a boost of energy to get through the rest of your day.
Lunchbox Addition:
Pack these bars in your kids’ lunchboxes for a healthy, homemade snack that’s both filling and delicious. They’re a great alternative to store-bought granola bars, and you’ll feel good knowing exactly what’s in them.
Dessert:
For a sweet treat, drizzle the bars with a little melted chocolate and serve them as a light dessert after dinner. They’re sweet enough to satisfy your dessert cravings without being overly indulgent.
Storage and Reheating Instructions
Storing the Bars:
Store the bars in an airtight container in the refrigerator for up to 7 days. If you want to keep them for longer, you can freeze the bars for up to 3 months. To freeze, layer the bars between sheets of parchment paper in an airtight container or freezer bag. When you’re ready to eat, let them thaw in the fridge or at room temperature for a few minutes.
Reheating Tips:
There’s no need to reheat these no-bake bars, but if you prefer to enjoy them warm, you can microwave them for a few seconds (just be careful, as they can become too soft). Alternatively, serve them chilled straight from the fridge for a firmer texture.
Nutritional Information (Per Serving)
- Calories: 220
- Total Fat: 12g
- Saturated Fat: 6g
- Carbohydrates: 25g
- Fiber: 3g
- Sugars: 10g
- Protein: 5g
- Sodium: 80mg
These Gluten-Free Bars with Oats and Coconut are packed with fiber from the oats and coconut, healthy fats from the almond butter and coconut oil, and a touch of natural sweetness from the honey. They provide a balanced snack that will keep you full and energized.
Cost Estimation
Approximate Cost per Serving: $0.90
Making your own gluten-free bars at home is not only more affordable than buying pre-packaged snacks, but it also allows you to control the quality of ingredients. With basic pantry staples like oats, almond butter, and shredded coconut, you can make a large batch of bars for a fraction of the cost.
Love gluten-free snacks? Check out our recipe for Gluten-Free Banana Oat Pancakes.
Learn more about the health benefits of oats and why they’re a great addition to your diet here


