Introduction
Creating your own yogurt at home can be a rewarding and nutritious endeavor, especially for those who follow gluten-free or dairy-free diets. This Gluten-Free Homemade Nondairy Yogurt is not only easy to prepare but also customizable to your flavor and texture preferences. Using nondairy milk options like coconut, almond, or oat milk, this recipe provides a creamy, probiotic-rich yogurt without the need for traditional dairy.
Nondairy yogurts can be quite costly in stores, often coming with added sugars and stabilizers. Homemade yogurt, however, offers a more affordable, wholesome option that allows you to control exactly what goes into it. This recipe uses a small amount of thickening agents, if desired, like agar agar or tapioca starch, which enhance the yogurt’s consistency without compromising its natural taste.
Whether you’re new to making yogurt or a seasoned pro, this guide is easy to follow and adaptable to various nondairy milk types. Enjoy your homemade yogurt on its own, with fresh fruit, or as a base for smoothies and parfaits. Let’s dive into the steps of making this creamy, dairy-free treat that’s perfect for your daily probiotic boost.
Ingredients List
For the Yogurt:
- 4 cups of nondairy milk (coconut, almond, or oat milk)
- 2 tablespoons tapioca starch or 1 teaspoon agar agar (optional, for thickness)
- 1 tablespoon maple syrup or honey (optional, helps fermentation)
- 1 packet or ¼ teaspoon probiotic powder or 2 probiotic capsules (without fillers)
Optional Add-Ins for Flavor:
- 1 teaspoon vanilla extract
- Fresh fruit, such as berries or banana slices
- 1-2 tablespoons of jam or preserves for added sweetness
Substitutions and Tips:
- Thickener Options: Agar agar and tapioca starch are excellent options for thickness. Agar agar creates a firmer texture, while tapioca starch gives a creamier consistency.
- Probiotic Sources: Use a high-quality, gluten-free probiotic for the best results. Be cautious to select a brand that doesn’t contain dairy or gluten-based fillers.
- Flavor Adjustments: Maple syrup adds a touch of sweetness but can be omitted if desired. Vanilla extract or fresh fruit makes a wonderful addition to elevate the flavor profile.
Step-by-Step Instructions
1. Prepare the Nondairy Milk Base
- Heat the Milk: Pour 4 cups of nondairy milk into a medium saucepan and heat gently over medium heat, bringing it to about 180°F (82°C). Stir occasionally to prevent burning. Heating the milk will help it thicken and create a creamier consistency.
- Cool the Milk: Remove the saucepan from the heat and allow the milk to cool to 110°F (43°C). Use a thermometer to check the temperature, as the milk should be warm but not hot when adding the probiotic.
2. Incorporate the Thickener (Optional)
- Add Tapioca Starch or Agar Agar: For a thicker consistency, whisk in tapioca starch or agar agar while the milk is cooling. This step helps the yogurt achieve a creamier or firmer texture, depending on your preference.
3. Add Probiotics and Sweetener
- Mix in Probiotic Powder: Open the probiotic capsules (if using) and sprinkle the powder into the warm milk. Stir well to combine. The probiotics are essential for fermentation, which is key to creating that tangy yogurt flavor.
- Optional Sweetener: For a slightly sweet flavor, stir in a tablespoon of maple syrup or honey, which also encourages the fermentation process.
4. Fermentation Process
- Transfer to Jars: Pour the milk mixture into clean, glass jars, leaving a small amount of space at the top. Cover each jar with a piece of cloth or paper towel, secured with a rubber band, to allow airflow during fermentation.
- Incubate the Yogurt: Place the jars in a warm, draft-free area (between 105°F and 110°F) for 8 to 24 hours, depending on how tangy you like your yogurt. The longer it ferments, the more tart the yogurt will become. If you have a yogurt maker, follow the machine’s instructions.
5. Chill and Serve
- Refrigerate the Yogurt: After the fermentation period, cover the jars with lids and refrigerate the yogurt for at least 4 hours to help it set. This cooling process will further thicken the yogurt.
- Add Toppings: Before serving, top with fresh fruit, a swirl of jam, or a sprinkle of nuts for added flavor and texture.
Tips for Success
- Use Clean Equipment: To ensure your yogurt ferments properly, all equipment, jars, and utensils should be sterilized.
- Temperature Control: Consistent warmth is key to successful yogurt fermentation. Use an oven with the light on, a warm corner in your kitchen, or a yogurt maker to maintain the ideal temperature.
- Avoid Overheating Probiotics: Adding probiotics to milk that is too hot can kill the live bacteria, so be sure the milk has cooled to 110°F before adding them.
- Monitor Fermentation Time: Experiment with fermentation times. For milder yogurt, check after 8-10 hours. For more tang, allow up to 24 hours.
Recipe Variations
- Coconut Milk Yogurt: If you prefer a thicker, richer yogurt, use full-fat coconut milk. This variety tends to yield a thicker result without needing additional thickeners.
- Vanilla & Berry Yogurt: Add 1 teaspoon of vanilla extract before fermentation. Once chilled, layer with fresh or thawed berries for a fruity twist.
- Chocolate Yogurt: Stir in 1-2 tablespoons of cocoa powder and a touch of sweetener before refrigerating for a dessert-like yogurt.
- Savory Yogurt: Add chopped herbs, a pinch of salt, and lemon zest for a savory option that can be used as a dip or dressing.
Serving Suggestions
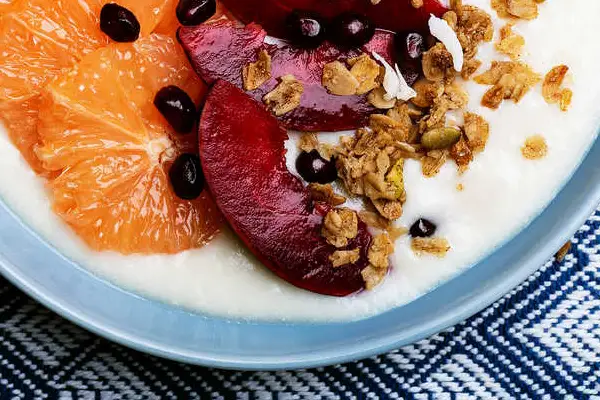
- As a Breakfast Base: Serve topped with granola, nuts, and a drizzle of honey or maple syrup for a satisfying start to your day.
- In Smoothie Bowls: Add nondairy yogurt to smoothie bowls for a creamy, protein-rich addition. Pair with fresh fruit and a sprinkle of chia seeds.
- Dairy-Free Parfaits: Layer your yogurt with fruit and gluten-free granola for a visually appealing and delicious snack.
- Savory Snack: Try the savory version as a topping for baked potatoes or as a dip for fresh vegetables.
Storage and Reheating Instructions
- Storing Your Yogurt: Store homemade nondairy yogurt in the refrigerator for up to 7 days in a sealed container. It will continue to thicken slightly as it chills.
- Reheating Tip: Although yogurt is usually served cold, you can gently warm it (for savory dishes) by setting the jar in warm water for a few minutes.
- Freezing Caution: Freezing yogurt may alter its texture, making it slightly grainy, so it’s best enjoyed fresh.
Nutrition Information (Per Serving)
- Calories: 120
- Fat: 6g
- Carbohydrates: 15g
- Fiber: 1g
- Protein: 2g
- Sugars: 8g
- Health Benefits: This dairy-free yogurt offers probiotics for gut health, and the almond or coconut milk base provides healthy fats without added sugars or preservatives.
Cost Estimation
- Approximate Cost per Serving: $1.25
- Budget Tips: Save by making your own almond or oat milk at home. Buying probiotic capsules in bulk can also reduce costs.
Check out our collection of gluten-free dishes to add variety to your meals!
Benefits of probiotics: Learn more about the health benefits of probiotics and how they can improve gut health in this article from Healthline.
Did you try this Gluten-Free Homemade Nondairy Yogurt recipe? Share your thoughts in the comments, and let us know if you added any special ingredients to make it your own! Don’t forget to share your creations with us on Instagram and Pinterest.


