


How to Set Up Artwork for Large Format Printing: DPI, Bleed, CMYK & File Formats
Preparing artwork for a large print is a little different from designing something for a website or social media. A file can look sharp on your laptop but become blurry once it is enlarged to banner or backdrop size. Text can also end up too close to a trimmed edge, colours may print differently from what you see on screen, or an important part of the design can get caught in finishing.
If you are preparing artwork for a banner, poster, pull-up banner, wall graphic, lightbox, or event backdrop, these are the main things to check before sending your file for printing.
Start With the Final Print Size
Before working on resolution, bleed, or colour, confirm the actual finished size of the print.
If you need a 2 m × 1 m banner, design for that proportion from the beginning. Changing the proportions later can stretch images, distort logos, or force you to crop part of the design.
For very large artwork, some design programs may not comfortably support the full dimensions. In that case, you can work at a reduced scale such as 1:2 or 1:10, but make sure the scale is clearly stated when you send the artwork to the printer.
This is especially important for large-format jobs such as exhibition backdrops, wall graphics, outdoor banners, and oversized signage.

What Resolution Do You Need for Large Format Printing?
This is one of the most common areas of confusion.
For artwork files, PPI (pixels per inch) is the useful measurement. DPI usually refers to how a printer places ink dots on the printed material. Adobe describes image resolution in print as the number of pixels assigned to each printed inch, measured in PPI.
You also do not need to automatically make every large-format file 300 PPI.
The required resolution depends partly on how far away people will view the print. HP's current large-format guidance gives these practical ranges:
Application | Typical viewing distance | Suggested image resolution |
Outdoor banner | 20+ ft / 6+ m | 50–100 PPI |
Poster or banner | 5–10 ft / 1.5–3 m | 100–150 PPI |
Trade-show graphic | 3–5 ft / 1–1.5 m | 150–200 PPI |
Close-up display / fine art | Under 2 ft / 0.6 m | 200–300 PPI |
These figures are useful guidelines rather than fixed rules. Your material, image type, print process, and viewing distance all matter.
For example, a large outdoor banner viewed from across a road does not need the same image detail as an A1 poster that someone will stand directly in front of.
Check Resolution at the Final Size
This part matters.
A photo may technically be 300 PPI when it is small, but if you enlarge it several times, its effective resolution drops.
Simply changing a low-resolution image to “300 PPI” does not create missing image detail. Adobe notes that changing resolution without resampling does not add new pixel data.
Where possible, start with the original high-resolution photo rather than:
screenshots,
images copied from websites,
heavily compressed WhatsApp images,
small social-media downloads.

Add Bleed and Keep Important Content Inside the Safe Area
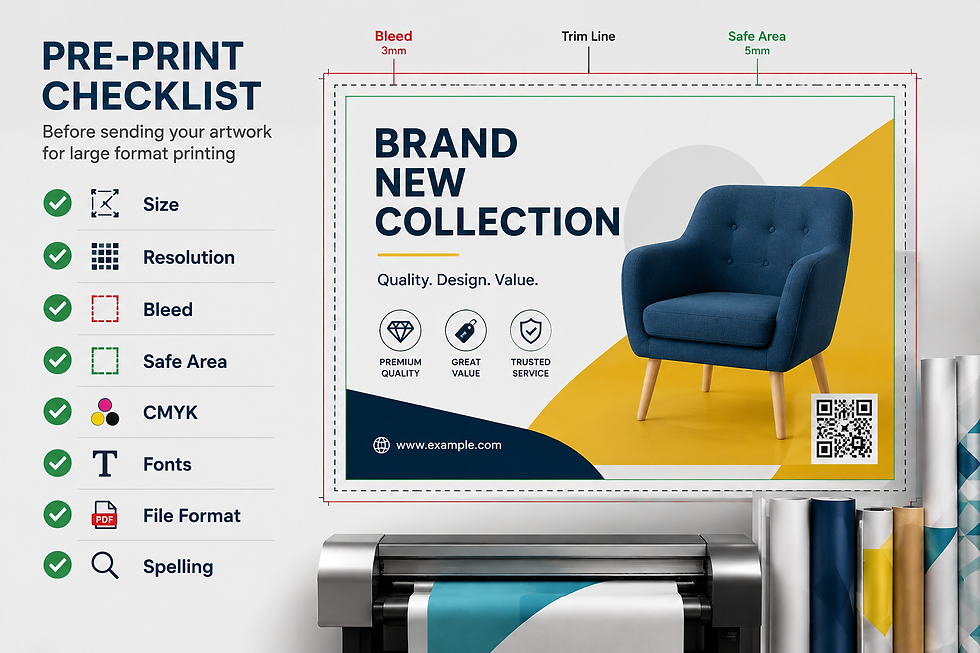
If your design has a background colour or image that needs to reach the finished edge, it normally needs to extend beyond the trim line. That extra area is called bleed.
Bleed gives the printer a small margin for trimming so you do not end up with an unintended white edge.
Adobe notes that 3 mm is a common commercial-print bleed, but it also recommends confirming the required amount with the print provider.
For large-format printing, do not assume that 3 mm applies to every product. A poster, banner, wall sticker, and backdrop may all have different finishing requirements.
You also need a safe area inside the final edge. Keep important elements such as:
logos,
text,
phone numbers,
QR codes,
important faces or product details
away from trimming and finishing areas.
For banners, you may also need to allow room for eyelets, hems, or pole pockets.

RGB vs CMYK: Why Printed Colours Can Look Different
Most screens display colours using RGB — red, green, and blue.
Many commercial printing workflows use CMYK for the final output, but you should not automatically convert every file yourself. Some print providers prefer receiving properly tagged RGB artwork and handling the colour conversion during prepress, so check with your printer first.
This is one reason a colour that looks very bright on your monitor may appear different when printed.
Bright greens, blues, and highly saturated colours can be especially difficult to reproduce exactly because a screen can display colours that standard printing inks cannot reproduce in the same way.
If colour accuracy is important for a company logo or brand campaign, provide the printer with the proper brand colour references instead of judging the colour only from your monitor.
For professional work, it is also better to ask the printer which colour profile they prefer before making unnecessary colour conversions.
Which File Format Should You Send?
There is no need to make this complicated.
For most finished large-format artwork, PDF is one of the safest formats because it can preserve the page layout, vector graphics, images, and embedded fonts in one file.
Good for finished artwork containing a mix of text, images, logos, and graphics.
AI or Other Vector Files
Useful when the printer needs editable vector artwork, especially for logos, lettering, line graphics, or layouts that may need adjustment.
Vector graphics can be enlarged without becoming pixelated.
TIFF
Useful for large photographic images where a high-quality raster file is required.
JPEG
JPEG can still work if the original file has enough resolution and has not been heavily compressed. The problem is usually not the JPEG format itself, but sending a very small or low-quality JPEG and trying to enlarge it.
Check Your Fonts and Logos
Fonts can change if the printer opens a file and the required font is missing.
For the final PDF artwork, embedding the fonts helps keep the text looking as intended. Adobe states that font embedding helps prevent substitution when a PDF is viewed or printed.
For logos, use a vector version such as AI, EPS, SVG, or vector PDF whenever possible.
Avoid taking a small logo from your website and enlarging it for a large banner. Web logos are often prepared for screens, not for printing several metres wide.

Think About the Final Material and Finishing
Artwork should also be prepared for the product it will become.
A poster does not have the same finishing requirements as a pull-up banner or an outdoor PVC banner.
For example:
Pull-up banners: Important information should stay away from the bottom area that rolls into the banner stand.
Outdoor banners: Allow space around the edges if eyelets, hems, or other finishing will be added.
Lightbox graphics: Colours and images need to work when light passes through or illuminates the print.
Wall graphics and stickers: Artwork dimensions should match the actual installation area.
Event backdrops: Keep important logos and text where people, tables, or stage equipment will not constantly block them.
GPG Printing currently produces large-format products in Singapore, including pull-up banners, posters, wall stickers, outdoor PVC banners, and lightbox backlit prints.
Do a Final Artwork Check Before Printing
Before sending the file, check:
Final width and height
Artwork scale
Image resolution at final print size
Bleed where required
Safe area
RGB/CMYK and colour requirements
Fonts
Logo quality
Spelling, phone numbers, URLs, and QR codes
Correct file format
Material and finishing requirements
A few minutes spent checking the file can prevent delays or a reprint later. HP identifies incorrect resolution, missing bleed, font issues, wrong colour handling, and poor substrate choices among common causes of large-format printing problems.
Preparing Artwork for Large Format Printing in Singapore
If you are preparing artwork for a banner, poster, backdrop, wall sticker, pull-up banner, or another large print, send us the finished size, quantity, material or intended use, artwork file, and required timeline. If you are unsure whether the artwork is suitable for printing, we can review the project requirements before production.
GPG Printing provides Large Format Printing in Singapore for businesses, schools, event teams, designers, and other custom projects. Our workshop is located at 18 Boon Lay Way, #08-99 TradeHub 21, Singapore 609966. Our current large-format range includes posters, pull-up banners, wall graphics, outdoor PVC banners, stickers, and lightbox printing.


Comments